
Tools
-
-
This Guide explains the Firmware loading process for OpenEVSE.
-
This guide is specifically intended for the Windows Operating system. Advanced users may use a similar process for MacOS and LINUX.
-
-
-
Download Windows Driver for the OpenEVSE Programmer. Using this guide. https://rayshobby.net/dead-simple-driver...
I didn’t understand the technical aspect of this step, but I followed the link and then downloaded the http://zadig.akeo.ie/ link. Once I connected the OpenEVSE Programmer to the USB port of my computer I opened the Zadig progam, scrolled through the menu in the window to select “libusb-win32 (v1.2.6.0)” and then clicked the “Install” button. It successfully installed the driver that I needed without any other input from me.
-
-
-
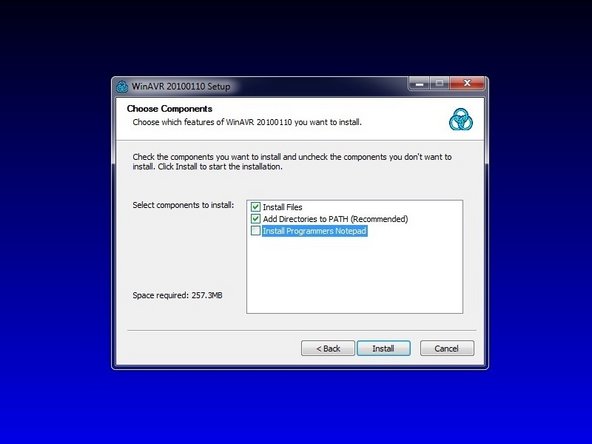
Download and install the WinAVR software. WinAVR
-
Select BOTH the Install Files and Add Path Options. Developers Notepad is Optional.
-
-
-
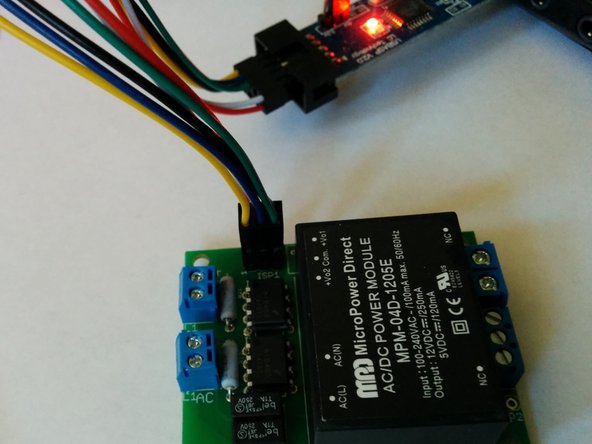
Connect Programmer to OpenEVSE then connect to USB port on PC.
-
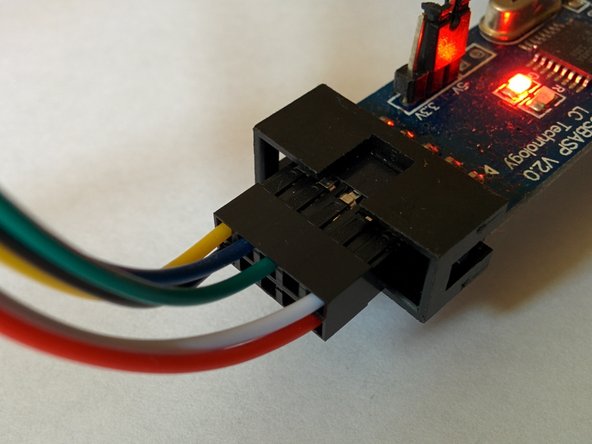
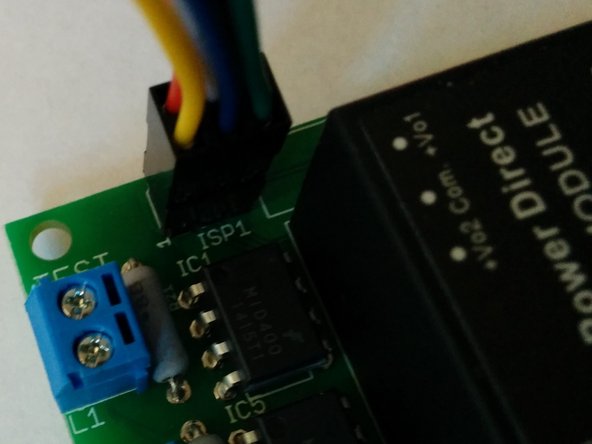
The red stripe on the ribbon cable or yellow wire on the 6 pin connector aligns with pin 1 of the ISP connector.
The programmer I received a few weeks ago now has a ribbon connector instead of all the wires. I followed the pictures carefully and it seemed like the red line on the ribbon was opposite to where the yellow wire was on the programmer. I therefore lined the other side up with the 1 on the OpenEVSE. It didn’t work. I turned it around and it did work so I’m not sure where the parity mismatch happened, but I guess if it doesn’t work, reverse it and try it the other way? This could use updated instructions for the ribbon cable. My 2018 OpenEVSE also had the 6 pin connector rotated 90 degrees from shown in the pictures.
-
-
-
Download a pre-compiled HEX file from the OpenEVSE Sources for your OpenEVSE product and your desired configuration.
-
Download the latest firmware and save files into a local folder.
-
If the ATMEGA328P chip has never had firmware loaded fuse bit must be set with the following command: avrdude -c USBasp -p m328p -U lfuse:w:0xFF:m -U hfuse:w:0xDF:m -U efuse:w:0x05:m
-
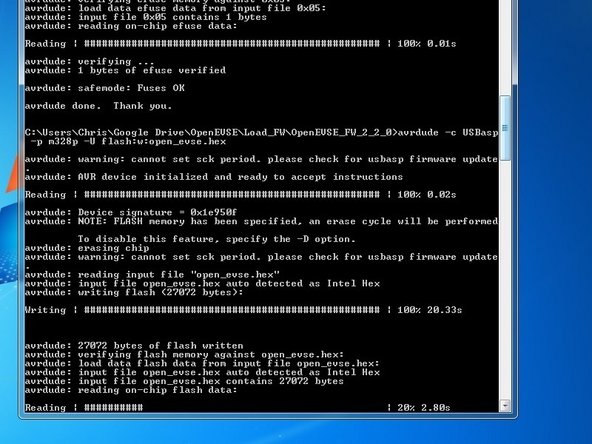
To upgrade firmware, run the following command at a terminal or command prompt. avrdude -c USBasp -p m328p -U flash:w:file_name_of the_firmware.hex
-
Warning can not set SCK period is normal and can be ignored.
-

Cancel: I did not complete this guide.
11 other people completed this guide.
13 Comments
(cont’d from previous, due to 1024 char limit per comment)
4) On my revision of the PCB, the DC-DC converter is too close to the ISP pins to allow for the IDC connector’s key; like Ed Hubbell, I had to shave off the IDC connector key to get it to fit to the pins. I see that later PCB revisions have moved the DC-DC converter to the right, and still other revisions have rotated the ISP pins 90°. For this reason, perhaps multiple Guides for firmware updating (or branches to the existing/monolithic Guide) should be considered.
More notes and pictures are here: https://nissandiesel.dyndns.org/viewtopi...
A few problems arose as I attempted the above recipe.
1) https://github.com/OpenEVSE/open_evse/re...
As of this writing, the Assets for 8.2.0 and 7.1.6 do not contain “flash.bat” nor “eeprom_24.bin”.
2) The filename for firmware releases is now “openevse.hex”, not “open_evse.hex”.
3) The OpenEVSE ISP programmer that I was shipped in Oct2019, Order #6383, was a Polulu USB AVR Programmer v2.1, which shipped with a std. ribbon cable and IDC connector; therefore, the instruction in Step 4: (“The yellow wire on the 6 pin connector aligns with pin 1 of the ISP connector.”) is not applicable. Perhaps I was not sent a harness I was supposed to receive, or a previous programmer that OpenEVSE shipped had a different harness.
(cont. next comment)
the OpenEVSE Plus device that is listed at the top of the page, that is a part that is inside our OpenEVSE charging stations, right?
(It is listed as a part at the top of this page, and i have a doubt as to whether it is a second device that needs to be purchased.)
Shawn Kovac - Resolved on Release Reply
Using avrdude 1:6.3-7 on an up to date Arch Linux x86_64 install, running:
$ avrdude -c USBasp -p m328p -U lfuse:w:0xFF:m -U hfuse:w:0xDF:m -U efuse:w:0x05:m
Gave back a lot of output, which I have pasted here: https://pastebin.com/7hc2iMK8 . If I am reading the output correctly, the first two operations apply correctly, but the last one does not. I went ahead and executed the following two commands to flash the .hex and the .bin, which both appear to have succeeded.
Is the error shown on the last step of the paste a problem?
Also, the instructions are not specific as to how/when to disconnect the programmer from the OpenEVSE board. Thanks.
If you also got the ribbon cable, it’s very difficult to figure out which way to connect it. I double checked it twice with the pictures/yellow wire location/red ribbon mark/”1” on the OpenEVSE and still got it wrong. But worked when I flipped it. Could use some pictures for the ribbon cable and also for the older OpenEVSE with the 6 pin connector rotated 90 degrees from these pictures.
Am I missing something? This sems to end at step 4… Not sure what to do next…
carloswlkr - Resolved on Release Reply
Yes, it looks like a contributor accidentally removed step 5. We have reverted to the version prior to the edits.
The USBasp that I got had a ribbon cable. Orientation of the cable is tricky - The key on the cable jams into a part on the OpenEVSE board. I had to shave off the key to get things to work. Once I did that, things work great. Even from iOS, writing with the Arduino software.
Ed Hubbell - Resolved on Release Reply
The firmware link in the store just points us to the GitHub repo. Where can I find the pre-compiled versions of the firmware?
teslatradeup - Resolved on Release Reply
Pre-Compiled versions are located at:
OpenEVSE Github
Default Firmware Loads
Correction: the batch file for all newer firmware versions is "flash.bat"
donahuepaul - Resolved on Release Reply
You can get a signed version of the USBasp driver from http://www.protostack.com/accessories/us...
Should make things a lot easier.